 |
  |
|
|
by D Laurent Ah! The wonderful smell of stock simmering on the stove! It perfumes the house with such wonderful rich, golden, savoury aromas. It makes you long for dinnertime. I grew up with those wonderful smells. Both my mother and my grandmother made their own stocks and those pots of glorious nectar were always bubbling on the back of the stove (or the Raeburn in my Grandmother’s case), ready to be turned into soups, stews and hot pots. There is truly nothing better than soup made with homemade stock. Shop bought stock just can’t compare and those terrible stock cubes are an abomination. Homemade stock is rich in flavour and goodness, a healthy and wonderfully versatile ingredient in so many dishes. If you do nothing else for your family’s health, make your own stock. It’s full of nourishment; the slow simmering process extracts the goodness from the bones and vegetables and creates a delicious mineral rich broth, full of bio-available calcium, magnesium, phosphorus, silicon, sulphur and trace minerals. If you don’t think the bones give up their minerals then try squeezing a chicken bone from a stockpot that’s been simmering over a two day period. You’ll find the bone crumbles away in your hand. Making Stock
There are two types of stock, white and brown. White stock is made from uncooked bones that are put straight into the stockpot and brown stock is made from bones that have been roasted first. White stocks are lighter in taste and colour than brown stocks and are more suitable to light delicate soups. Brown stocks are wonderful for winter soups recipes. Choosing bonesYou can use poultry like chicken, duck or turkey, or larger animals like beef, lamb, venison, and pork or even ham bones. Each gives it’s own unique flavour. Use the bones left over from a roast or buy cheap cuts with a lot of bone in them, like shin, knuckle or neck. Marrow bones are excellent and so are tough cuts of meat, which will give up their goodness to the stock just the bones will. Chicken wings and necks are cheap and make a great stock. To roast or not to roastRoasting the bones gives the stock a different flavour and a darker colour. I love stocks made from roasted poultry. They’re rich and delicious! But if you are planning to make light, delicate soups from your stock then you shouldn’t roast your bones because the stronger flavour and colour might overpower your soup. It’s economical tooStock making is very economical. Making stock from the leftover bones from the family’s roast chicken gives you an extra meal from the bird. Chicken wings and chicken necks can be bought very cheaply from your butcher and they’ll make a good stock. Even cheaper (in fact sometimes completely free) are the carcasses of chickens left over after the butcher has cut the joints off. Two carcasses will make an excellent stock. If you can’t afford organic chicken but you have an organic chicken producer at your local farmers market it’s worth asking him if he could do you a couple of chicken carcasses. He probably won’t charge you very much for a carcass and might even give you them free. Ham bones make a lovely stock. Some supermarkets will sell you the ham bones when the ham is finished. It's worth asking. VegetablesMy mother would use all the peelings from the vegetables in the stockpot. A sensible idea as so much of the vitamin and mineral content is in the skin. There were a couple of rules on vegetables for stock;
Her stockpot would be simmering away all week, giving out a steady supply of heavenly smells and fabulous soups. On Sunday morning she’d add green veg like celery to the stock for an hour or so, then she’d strain off the stock, throw out the remains and wash the stockpot out ready for the next batch. As she prepared the veg for the Sunday lunch the peelings would go in the stockpot along with an onion, garlic and some bay leaves. Once we’d eaten our lunch the bones, skin and the juices from around the meat (if there were any left of course) would go into the stockpot and the whole process would start again. One thing I love about stocks; they’re a great way of eating your vegetables without having to eat your vegetables! Because the stock takes all the flavour and goodness from the vegetables, when you add stock to a dish you’re adding that flavour and goodness. A great way to get kids to eat their vegetables without having to fight world war three! Now, I love onions, but they always make me cry when I chop them, but all I need to do is add some stock and I have all the flavour of onions and none of the tears. So it’s worth thinking about the flavours you want in your stock. The Basics
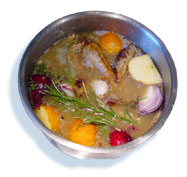
My favourite stock is from either a roast duck or a roast chicken. So first roast your bird and enjoy an excellent meal. But you could easily use an uncooked carcass after taking the joints off, or half a dozen chicken wings and chicken necks would do too. Put the bones, skin and any scrapings from the roasting pan into the stockpot or a large saucepan. Add a large onion cut into quarters (you can leave the skin on), some cloves of garlic (none if you hate garlic, half a dozen if you love it or somewhere in-between according to taste). Add some root vegetables; I add a couple of carrots and maybe a parsnip when I have them, or some celeriac, which adds a lovely flavour and doesn’t go bitter as celery does. Add a couple of bay leaves then top up with water. Add a splash of wine or kombucha or a tablespoon or two of vinegar or lemon juice (you add an acid to help draw the minerals from the bone) and a large pinch of salt (to help draw the juices from the veg). Now put the lid on and simmer very gently for around 3-12 hours, depending on your preference and your available time. Check regularly to make sure your stock isn’t running out of water and skim off any scum that rises to the surface. Once it’s done, strain the stock through a sieve and discard the remains of the bones and vegetables. A note on timingIf you work from home having stock simmering on the hob over a couple of days is easy to do. If you are out at work all day, put the stock on when you come home and simmer it for the evening. Don’t beat yourself up over the time it takes to cook. If it smells fantastic after 3 hours and you want to eat it, then eat it! Basically the longer it simmers the stronger and richer the taste. It’s up to you to decide what you like. Some people like to simmer for a long time and make a traditional rich stock, others like to pour off their stock after only two or three hours, add some more water and make a second batch. Two lighter batches for the price of one stronger one. Some people prefer poultry stocks and others prefer beef or lamb stocks. Some like their bones roasted others prefer them raw. Experiment and find a style that suits you. StoringYou can make stock in large batches and freeze it for convenience. In fact if you have enough space in your freezer you can save your bones and vegetable peelings in the freezer until you have the time to turn them into stock. To freeze stock first reduce it down; after straining the stock simmer it again until the stock is reduced to half its volume or even a third of its volume. You’ll have a very concentrated stock that will take up far less room in your freezer. When you use it add water to it to make up the volume. Or store your stock in jars in the fridge. If you have plenty of fat in your stock it will set on the surface. This is an excellent way of preserving stock, as the fat layer doesn’t allow air through, it forms a seal. The stock will keep for quite some time as long as the seal isn’t broken. I’ve had stock keep like this for a couple of months in the fridge. If you break the seal to use some of the stock you’ll need to reseal it or use all the stock within a couple of days. To reseal, reheat the stock and let it simmer for half an hour or so, allow it to cool then put it back in a clean jar in the fridge. Make sure you have enough fat to make a good seal. You can always add some fat to your stock to make sure you have enough for a seal. It must be saturated fats that set hard in the fridge. Try butter, lard or coconut oil. Tips
|
|||
 |
 Stock is easy to make, all you need are bones and vegetables, add
some salt and a little vinegar or sour wine and top up with cold water.
Now simmer for several hours. That’s it. At least that’s the
basics. Of course you’ll find fancy recipes that call for particular
ingredients and certain cuts of meat that make a very fine stock, but the
basics of stock making are bones and vegetables.
Stock is easy to make, all you need are bones and vegetables, add
some salt and a little vinegar or sour wine and top up with cold water.
Now simmer for several hours. That’s it. At least that’s the
basics. Of course you’ll find fancy recipes that call for particular
ingredients and certain cuts of meat that make a very fine stock, but the
basics of stock making are bones and vegetables.