The Basics
- 1 kombucha culture (or scoby)
- 2 litres of water
- 3 or 4 tea bags or 3 or 4 teaspoons of tea (green, white, or black
tea)
- 160 grams of white sugar
- 200 ml of kombucha from a previous batch as a starter or 2 tablespoons
of cider vinegar if you don't have any kombucha.
The Equipment
- A 3 litre glass Pyrex bowl
- A tea towel for covering the bowl
- A rubber band or piece of elastic to secure the tea towel
- A teapot or saucepan to make the tea in
- A measuring jug that can measure 2 litres
- A scale to measure the sugar
- A strainer
- Some bottles for storing the finished drink
The Method
A Note on Cleanliness
Make sure everything is very clean when handling kombucha. It's a living culture, a complex system of bacteria and yeasts and you don't want risk contaminating
it. Use freshly cleaned hands, clean jars and clean non metallic implements.
 Make
the tea Make
the tea
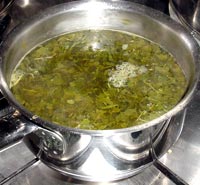
Make a pot of tea with the tea bags and leave it to brew for 15 to 20 minutes. Alternatively
add your tea to a saucepan and simmer it gently for 5 minutes.
Strain the tea into your measuring jug, add the sugar and stir it until it dissolves. Now add cold water to bring the tea up to 2 litres.
Hot tea can kill the culture. It should be no more than blood heat before you add it to your culture, so if it’s still too warm then let it cool
down before
you add it to the bowl.
Making the brew
Add the starter.
Into the Pyrex bowl put the starter liquid from the previous batch of kombucha. If this is your first batch then use
2 tablespoons of cider vinegar as your starter, (It adds the acid environment the culture likes) or some commercial kombucha if you have some.
Once
you’ve
made your first batch you’ll have your own kombucha to use as a starter on the next batch.
Pour the cool tea into the bowl.
Make sure your tea is cool before you add it to the kombucha culture! Hot tea can kill the culture. It should be no
more than blood heat before you add it to your starter.
Add the kombucha scoby.
Pick up your scoby and slide it into the bowl. It will probably float but sometimes they sink. It will make no difference
if it floats or sinks so don’t worry about it. If the scoby has a 'dirty' side where it's darker in colour and has beard like brown bits
sticking to it then put that side facing down into the tea. The brown bits are yeasts.
Cover it and leave it to ferment
Put your tea towel over the bowl and secure it with a rubber band or a piece of elastic. This keeps contamination out of your culture. Fruit flies
especially like the smell of kombucha and can appear like magic out of thin air to lay their eggs in the scoby. So it’s important to cover
it properly.
Put the bowl in a warm dark place (23°-30°C or 70°-86°F) like an airing cupboard or in a kitchen cupboard or near a radiator.
And that’s it!
Checking The Brew
The fermentation will take 5-14 days depending on the temperature.
If you check your brew after 2 or 3 days you’ll notice a scum forming
on the surface. It’s not scum at all; it’s the first thin
membrane of your new kombucha scoby.
Start tasting the brew after 4
or 5 days. Gently move the scoby aside and dip a spoon in to the liquid.
When the kombucha is ready it should be neither too sweet nor too sour.
This is rather a personal taste and will depend on how much sugar you
want left in the brew. Some like it sweet but others prefer it sour. It’s
up to you, so test it every day until its the way you like it.
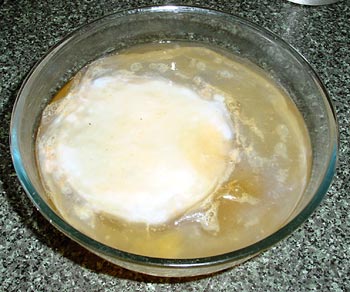
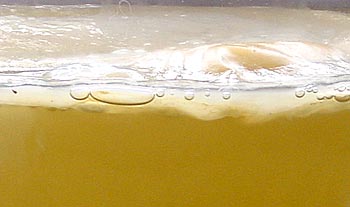
The round creamy blob is the starter culture. All around it a thin new
culture is developing
and you can see bubbles under the surface.
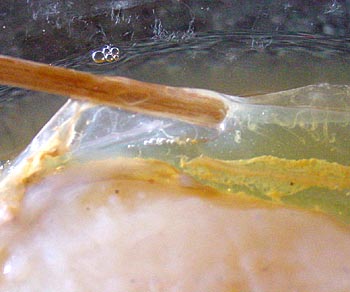
In this close up the new scoby is lifted off the
surface of the kombucha so you can see how thin and transparent it is
compared to the starter
scoby at the bottom of the photo. The yellow sediment floating in the
brew are yeasts and quite natural.
Bottling
When the kombucha is ready, with clean hands gently lift the
mother culture and it’s offspring out onto a clean plate.
 Strain the kombucha into your measuring jug leaving behind about 200ml
in the bowl as a starter for the next batch. Strain the kombucha into your measuring jug leaving behind about 200ml
in the bowl as a starter for the next batch.
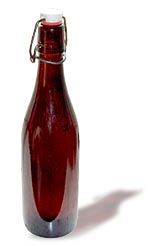
Now fill your clean bottles with the kombucha, label them and store
them in a cupboard or the fridge. You can use any kinds of bottles but
some batches will be a lot fizzier than others and it's a good idea to
use pop bottles, like the Grolsh bottles, that have rubber gaskets on them.
This kind of bottle will let out any excess pressure and prevent explosions!
After bottling your kombucha make up a second batch of tea for the culture
and set your second brew to ferment.
Kombucha is ready to drink immediately, but storing the bottled kombucha
for a month or two will give you will give you an even better drink.
This kind of bottle conditioning can improve the flavour as any home
wine
brewer
will
know. The sugar continues to ferment a little, giving you lighter, drier taste and producing more fizz.
The kombucha
will often grow little scobys on the top of the liquid in the bottles.
This is perfectly normal and nothing to worry about but look out for
them when you take your first mouthful!
You are now ready to drink your first
home made kombucha!
Cheers!
The Next Batch
Now you can make a second batch of sweet tea and when it’s cool
add it to the bowl and the waiting starter. Then add your scoby and put the tea towel back over
the bowl and put the bowl away to ferment.
For your first 2 or 3 batches it’s a good idea to use both the
mother and the baby together until the new scoby thickens up. When they
are new they can be paper thin. With each brewing a new layer will form
on top and your scoby will get thicker.
Then, when it's somewhere between a quarter and a half an inch thick,
you can gently separate the mother and baby and use the mother to start
off
a
second
brew.
Each scoby will grow with each brew, gradually getting thicker. You
can leave them like this and occasionally peel of a layer from the bottom
and discard it. Or you can separate them and either pass new scobys
on to friends or store them as spares in another jar of sweet tea which
you can keep in the fridge to slow down fermentation. It’s useful
to have spares in case your active culture becomes contaminated and you
need to discard the kombucha and the scoby and start again.
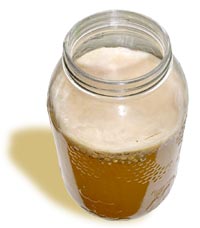
A close up of the same scoby as above after the
second batch has been brewed. You can see it has thickened up and is
now a
creamy
colour rather than transparent.
Notes and Variations
Containers
 The
kombucha culture needs oxygen for the fermentation. A Pyrex bowl gives
a large surface area and is an excellent brewing container. But
you can use taller jars to brew the kombucha, it will simply take
longer to brew because there's a smaller surface area exposed
to
oxygen. So 5-10 days in a bowl becomes more like 10-20 days in a
jar. The
kombucha culture needs oxygen for the fermentation. A Pyrex bowl gives
a large surface area and is an excellent brewing container. But
you can use taller jars to brew the kombucha, it will simply take
longer to brew because there's a smaller surface area exposed
to
oxygen. So 5-10 days in a bowl becomes more like 10-20 days in a
jar.
Several brewing suppliers now carry kombucha fermenting jars They are
wide mouthed jars, usually sat in a wicker container that helps to keep
the
light out. A 3 litre pickle or sweet jar will do very well too.
Temperature
Kombucha likes a steady temperature of 23°-30°C (or 70°-86°F).
A steady temperature gives a more consistent brew. In summer when the
air is warm this isn't too difficult. Keeping the brew in an airing cupboard
will
keep
it at
a constant
temperature too. But if you can't do that then in the winter as the temperature
changes from cold to warm with the central heating in modern homes there
will be a fluctuation in the brewing time and possibly in fizziness and
taste too. The Kombucha Network UK sell heating trays specially for kombucha.
Tea
Kombucha requires tea for its fermentation. That's
real tea (Camellia Sinensis) not herbal tea. Use black, oolong, green
or white tea and look for organic tea as contaminants in some commercial
teas can affect the culture.
Kombucha can be also be sensitive to strong aromatic oils.
A tea like Earl Grey
that
contains
Bergamot
oil, can sometimes
kill or badly affect the culture. So avoid these types of flavoured
tea.
Sugar
White sugar is cheap and works very well. Organic white sugar would be even better. Sugar is used by the yeasts
during fermentation, and is broken down and transformed
into acids, vitamins, minerals,
enzymes and
carbon dioxide. Sugar is also involved in the propagation of the Kombucha
culture. It uses the sugar to build the scoby. At the end of the fermentation period, if done correctly, the
sugar will have been virtually all converted and there should be little
or no sugar left in the kombucha. Using raw brown sugars can give the
brew a bad taste and result in poor culture formation.
Water
Chlorine added to water supplies to kill harmful bacteria
will, unfortunately, also affect the millions of friendly bacteria in
Kombucha. That’s why the water you use for brewing your kombucha
tea should be filtered. This can be done with a cartridge and jug, or
a system plumbed in under the sink. Jug filters will remove chlorine
from water and make it taste better. However, only the best quality water
filters will remove aluminium, bacteria and heavy metals, like lead,
along with organic pollutants like herbicides and pesticides.
If you don't have a filter then bring to the boil 2.5 litres of water
in a saucepan and simmer for 10 minutes. This will remove chlorine and
fluoride and other unpleasant things. You need more than your 2 litres
to allow for evaporation. However you'll need to let this sit until it's
cool before using it to make your kombucha.
|